
When I participate as a merchant crafter in weekend faires, I prefer to camp right behind by booth, in case violent weather, marauding orcs, or other emergencies require immediate attention to my display and goods. For this purpose, I use a small dome tent, just big enough for my bunk, spare clothes, chuck box, and a few other necessities. This tent is made of nylon and fiberglass. It is ample protection from the weather, but has a frightfully mundane appearance. Up to now I’ve had to collapse it and hide it under a big pile of tablecloths during faire hours.
It occurred to me that the same sort of disguise I use on my display pavilion could be applied to the dome tent. I call this my “Halfling Pavilion.” The goal is to create a medieval-looking tent cover, but scaled down to hobbit size.
My secondary
goal was to
make the tent cover as simple as possible. I’m a stitcher (not a
blacksmith
or
carpenter) so I wished to build the frame out of prefabricated parts,
without
having to create any complex custom joints. I didn’t quite succeed, but
more on
that later.
At swap meets, you will see shade canopies built out of galvanized steel electrical conduit. This material is suitably tough and more rigid than PVC or other plastics. It looks plenty mundane in its raw state, but can be painted. The real advantage is the variety of prefabricated joints available to fit conduit of all the standard diameters. You can find dealers selling these connectors at many outdoor swap meets and at tent & awning supply stores. Locally, these include Phoenix Tent & Awning and Mark’s Nuts, Bolts and Surplus. Online suppliers include Creative Shelters at http://www.creativeshelters.com/.
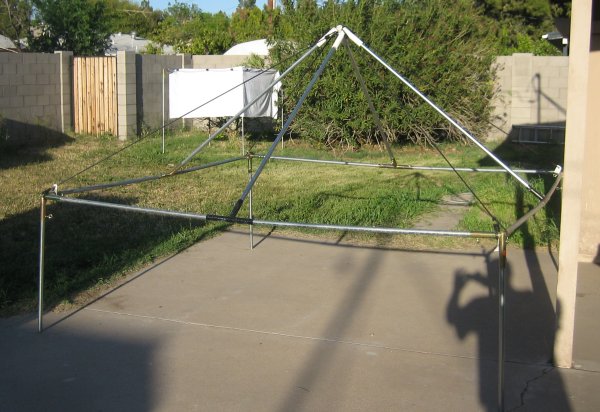
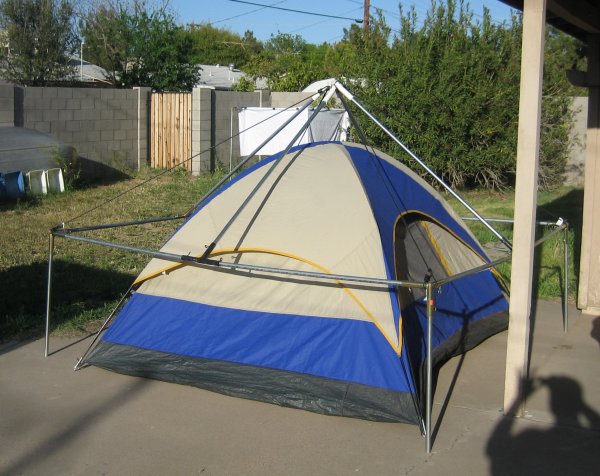
My dome tent is eight feet wide, seven feet deep and 4.5 feet tall in the middle. I decided to give the frame an eight-foot square base with a pyramid top to mimic the shape of my display pavilion. For ease of transport, I cut the longest frame members in half at the joints.
These standard connectors are really meant for tents with flat tops or ridge poles. I had to do some adapting to make them form a pyramid shape. I used a corner joint where each leg meets a corner of the pyramid. I used a tee joint in the middle of each wall to attach a sloping roof support, which runs up the middle of each face of the pyramid. These tees also connect the two halves of each side rail. This arrangement supports the middle of each pyramid face, but would let the edges droop, so I added ropes which run from the apex of the pyramid to its corners. I used bungee cord for these support ropes, but plain rope with a sliding tension adjuster would work too.
The galvanized steel conduit is sold in ten-foot lengths. For simplicity, I made the legs of the frame 30 inches long (one-quarter of a conduit piece) and the sloping face supports of the pyramid top five feet long (half of a conduit piece). I had to muck about with the Pythagorean Theorem a bit before I convinced myself this would work.
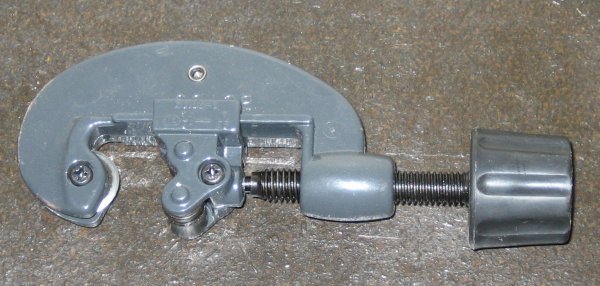
Do yourself a favor. Get a plumber’s pipe cutter before you begin work. This is a circular carbide blade mounted in a metal frame with a thumb screw. You rotate the frame around and around your pipe, slowly tightening the thumb screw as you go. This cuts the pipe neat and square. It’s a lot less work for much better results than using a hacksaw. A pipe cutter suitable for ¾-inch nominal conduit costs about ten bucks at a hardware store. Twenty dollars will get you a larger cutter, suitable for wider pipe.
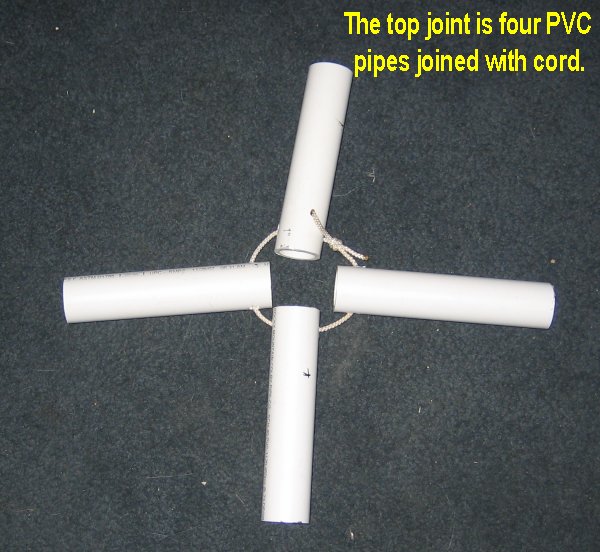
The tricky part was to create a top joint which would bring the four side poles of the pyramid together with the four corner ropes.
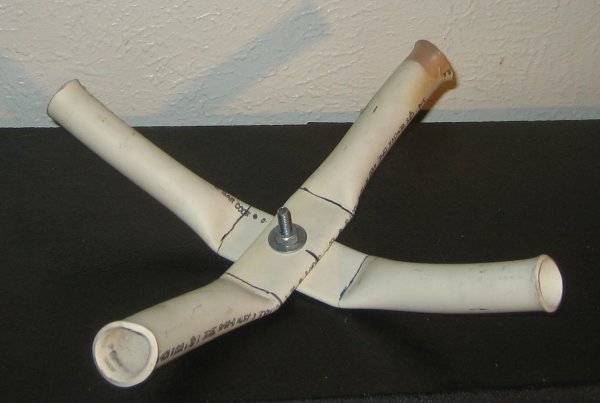
To repair one of my old pavilions whose top joint had broken, I once constructed a bent X shape of PVC pipe. I placed two lengths of PVC in an oven to soften, then bent them to the approximate angle using oven mitts. I connected the two bent pieces of PVC with a bolt. It works, but my workmanship was less than spectacular. The result looks like a deformed sea creature from an H.P. Lovecraft story.
For the halfling pavilion, I went with something simpler. I cut four 6-inch lengths of PVC pipe with an inside diameter just larger than the conduit frame pieces, drilled through them, and connected them with a loop of nylon cord. The pyramid supports insert into the PVC pipes and the bungees hook to the cord between the pipes.
Now that my frame was assembled, I took measurements for a reality check. Sure enough, the joints had added a bit of length to the walls. I needed four triangular faces for the pyramid that were 100 inches on the base and 65 inches in altitude. For particoloring, I divided each pyramid wall into two pieces – left and right. After adding seam allowance, these could be constructed by dividing a rectangle 65 inches high by 51 inches on the diagonal.
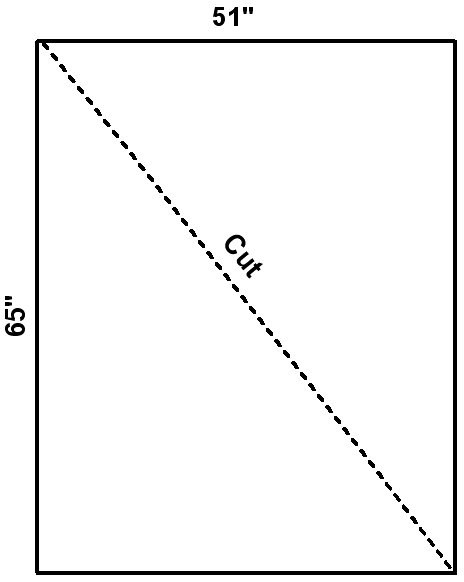
Make the cut on two layers each
of two different colors of fabric, oriented right side up. I used
cotton twill,
which is available in many colors and is easy to work with. Poplin or
duck
should work too.
The sidewalls are rectangles 30 inches high and a bit longer than eight feet. I chose to divide each of these sidewall panels into two colors to continue the particolored theme. The wall panels are centered on the corners of the pavilion and overlap each other in the middle of each wall. This creates a door flap in the middle of each side of the pavilion, so it doesn’t matter which direction you set it down over the frame. – The door flap will always be lined up with the door of the dome tent. I mounted metal grommets at regular intervals along the bottom edges of the sidewalls so that they can be tied down if needed.
To enhance the medieval look of the pavilion, I inserted dags into the seam between the pyramid top and the walls. These dags are simple equilateral triangles twelve inches on a side, with their exposed edges hemmed by turning under or using a serger.

To set up the halfling pavilion: Pitch the dome tent, assemble the frame around it, lower the pavilion skin over the frame, adjust its position, then tie down the tent sides with stakes. If you expect significant wind, you can use foot pieces at the bottoms of the legs and stake the foot pieces to the ground.